




Listening Article
Table of Contents
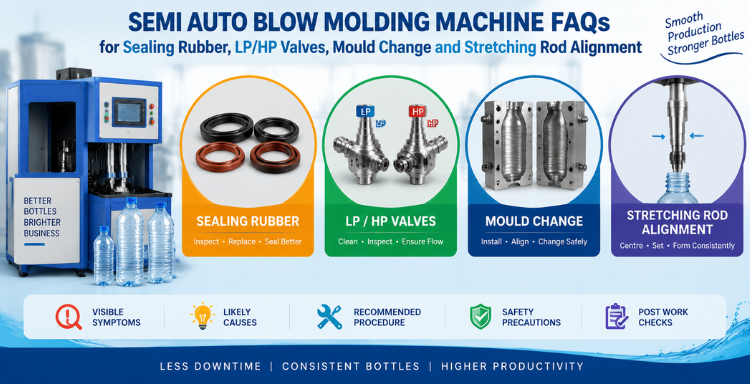
Semi Auto Blow Molding Machine FAQs for Sealing Rubber, LP/HP Valves, Mould Change and Stretching Rod Alignment
September 18, 2026
AI Summary
Running a semi auto blow molding machine for a mineral water plant smoothly depends on a few small components working correctly together. Three maintenance areas need regular attention: inspecting and replacing worn sealing rubber, cleaning and inspecting the low pressure and high pressure valve assembly, and installing, aligning and changing a bottle mould or die, along with centring and setting the stretching rod correctly. Covering the visible symptoms, likely causes, recommended procedure, safety precautions and post work checks for each helps mineral water plant owners, production managers and machine operators keep bottle formation consistent and avoid unplanned downtime.
Understanding Semi Auto Blow Molding Machine Maintenance
A mineral water bottling line depends on consistent bottle formation, and that consistency comes down to how well a few key components are maintained. Small parts such as the sealing rubber, the low pressure and high pressure valve assembly and the mould alignment settings directly affect whether a bottle blows correctly or comes out defective. Left unchecked, worn or misaligned components can lead to air leakage, incomplete blowing, off centre bottles or damaged moulds, all of which slow down production and add to costs.
Dharmanandan Techno Projects Pvt. Ltd. (DTPPL) offers a semi automatic PET blow moulding machine and PET stretch blow moulding machine that combines pneumatic and hydro pneumatic versions to deliver better and faster quality output. These machines are used to manufacture mineral water jars ranging from 5 litre to 20 litre sizes.
 Call Now!
How Sealing Rubber Affects Semi Auto Blow Molding Machine Bottle Blowing
The sealing rubber is a small part that fits inside the sealing nozzle, and it plays a big role in bottle formation. During the blowing process, air needs to travel into the bottle so it can expand and take shape correctly. The sealing rubber helps direct that air where it needs to go.
When the surface of the sealing rubber becomes worn or uneven, the seal is no longer tight. Instead of the air going into the bottle, it escapes around the damaged surface. Without enough air reaching the bottle, the bottle either fails to blow at all or forms incorrectly. Because the sealing rubber sees continuous use during production, it wears down over time and needs regular attention.
How to Inspect and Replace Sealing Rubber in a Semi Auto Blow Molding Machine
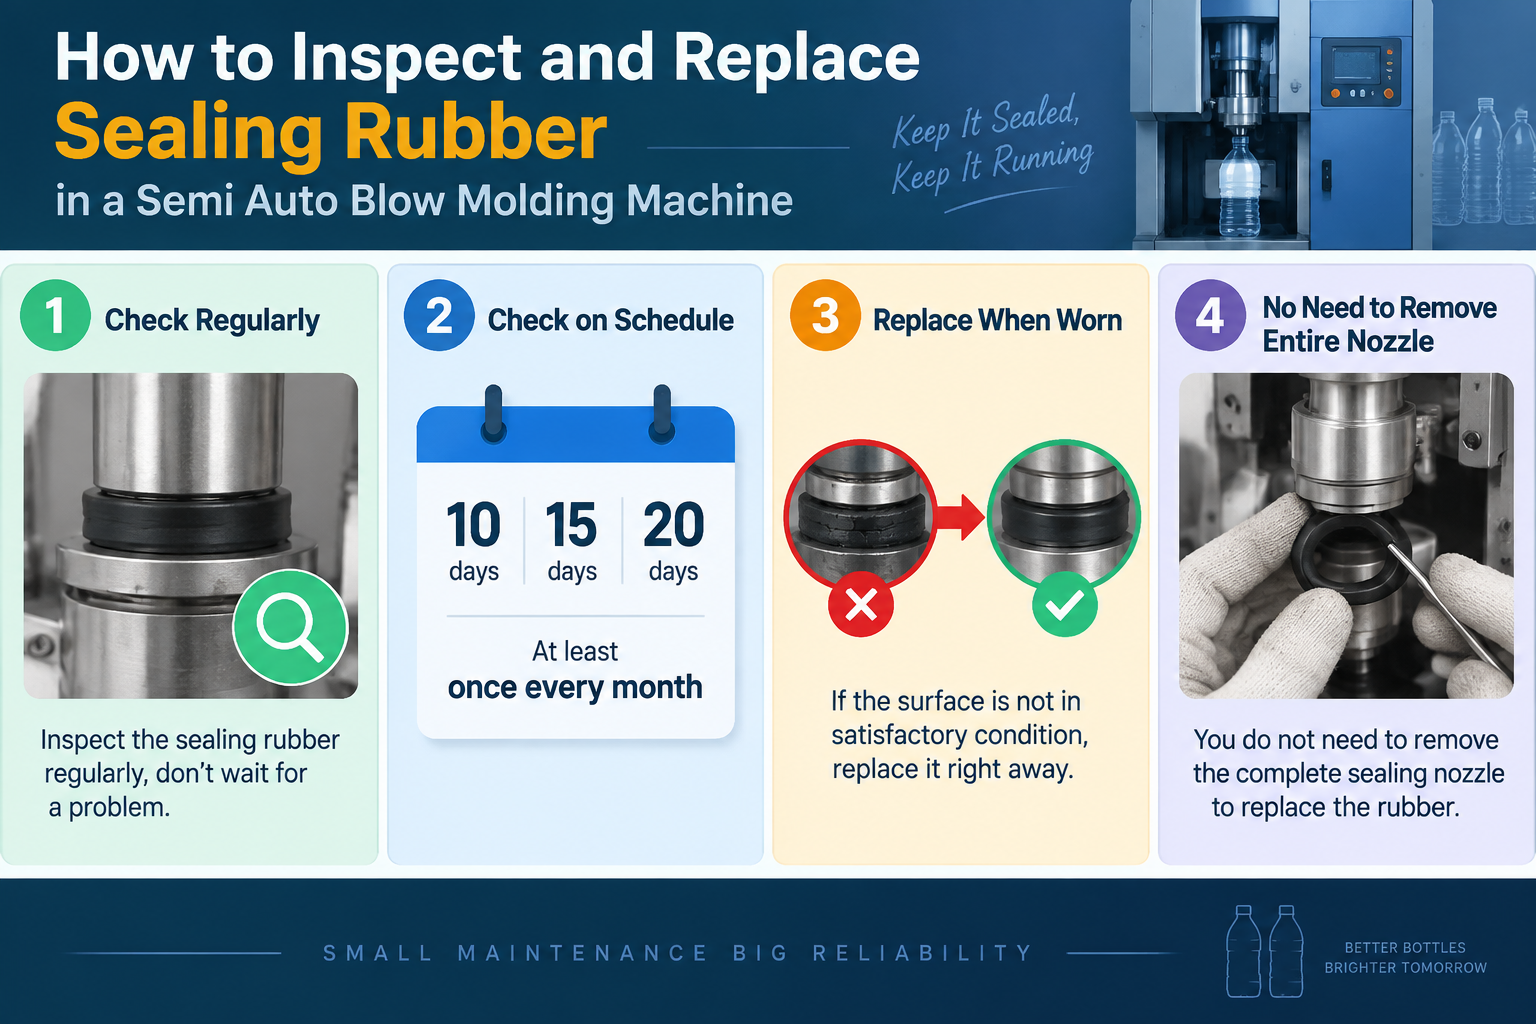
- Check the sealing rubber regularly rather than leaving it until a problem shows up on the line
- Check it every 10, 15 or 20 days, and at least once every month
- Replace it right away if its surface is not in satisfactory condition, rather than waiting for the next scheduled check
- You do not need to remove the complete sealing nozzle to replace the rubber
- Open only the specific section of the nozzle where the rubber sits
- Remove the old, worn rubber from the opened section
- Fit the new rubber with the thicker side facing inward and the thinner side facing outward
- Fitting it the wrong way round, with the thinner side facing inward, can cause the rubber to come out or fail to sit properly
- Once the new rubber is correctly positioned, refit and tighten the nozzle section completely
- Sealing rubber is a consumable part that gets used up through normal operation and needs periodic replacement
- Keep the necessary consumable parts available in stock so a worn sealing rubber does not bring production to a halt while you wait for a replacement
- Sealing rubber wear is not the only possible cause of a pressure related bottle defect, so if replacing it does not resolve the issue, check the low pressure and high pressure valve assembly next
Why LP and HP Valve Problems Affect Semi Auto Blow Molding Machine Bottle Formation
If bottles are coming out incompletely formed or misshapen even after checking the sealing rubber, the low pressure and high pressure valve assembly, often referred to as the LP and HP valve, may be the cause. This valve controls the air pressure used at different stages of the blowing process.
Over time, the O ring inside the valve can get cut, or the seal kit can get damaged. When this happens, the valve gets bypassed internally, which means it can no longer be controlled properly. Since the semi automatic blow molding machine can no longer regulate low pressure and high pressure air the way it should, the bottle does not form correctly.
OUR OTHER PRODUCT
How to Clean and Inspect the LP and HP Valves in a Semi Auto Blow Molding Machine
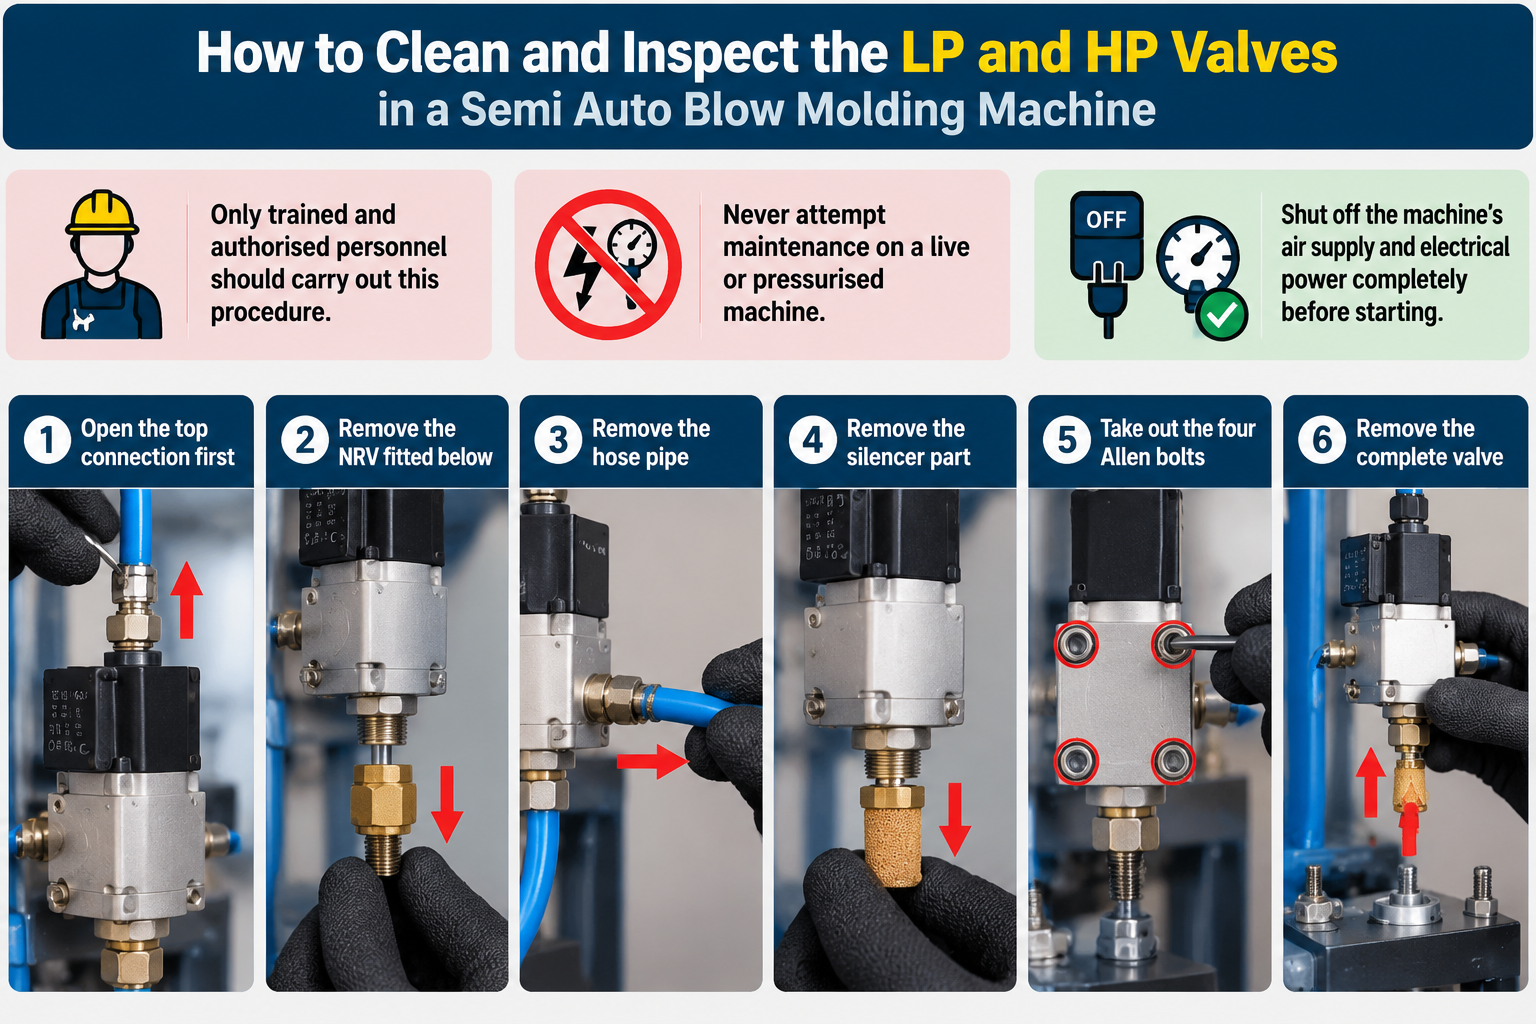
- This procedure involves dismantling a pressurised, electrically connected part of the machine, so only trained and authorised personnel should carry it out
- Never attempt maintenance on a live or pressurised machine
- Shut off the machine’s air supply and electrical power completely before starting any work on the valve
- Open the top connection first
- Remove the NRV fitted below
- Remove the hose pipe
- Remove the silencer part
- Take out the four Allen bolts holding the valve assembly in place, which allows the complete valve to come out
- Once removed, separate the valve into its low pressure and high pressure sections by removing the two connecting bolts
- Tools needed: number 10, 11, 12 and 13 spanners, a thick spanner, a number 5 Allen key and a screwdriver
- Take photographs or record a video as you work, so you have a reference for reassembly
- Keep matching components arranged together in pairs so nothing gets mixed up
- Keep proper track of exactly how each part was positioned, since parts placed in the wrong location will not fit correctly and the valve will not work
- Apply a 10 or 11 spanner firmly at the bottom to loosen the first bolt
- For the second bolt, place a cloth over the component before gripping it, rather than holding it directly with your hands, to avoid damaging the part
- With the cloth in place, use the 10 or 11 spanner to remove the bolt completely
- Once both bolts are removed, press the middle part gently and the assembly will separate
- Remove the piston, O rings and other internal components
- Clean all the parts thoroughly with diesel
- Inspect the O rings and seal kit closely for any cuts or damage
- If the O ring or seal kit is cut or damaged, replace it before reassembling
- Reassemble every component in exactly its original position
- If a part goes back in the wrong place, the valve will not function properly
- Follow this same inspection, cleaning and reassembly process for the high pressure valve as well
Why Correct Mould Installation and Alignment Matter in a Semi Auto Blow Molding Machine
Changing the mould allows a mineral water plant to produce different bottle capacities, depending on the machine configuration and the moulds available, such as 200 ml, 250 ml, 500 ml and 1 litre sizes. However, if the mould is not installed and centred correctly, it can affect how the bottle forms, including its alignment and the shape of its base.
Client Review
“We are satisfied with DTPPL’s blow molding machine. The machine offers reliable performance, consistent output, and good build quality.”
– Homi Irani
How to Change the Mould or Die Safely in a Semi Auto Blow Molding Machine
- Mould installation involves several careful steps, and skipping any of them can affect bottle quality or damage the semi automatic blow moulding machine
- Confirm the exact procedure against your machine manual or with DTPPL before attempting it on your own equipment, since recommended steps may vary slightly by model
- Check that the air supply is reaching the machine from the compressor
- Open the air inlet valve slowly, since opening it abruptly can place sudden pressure on pneumatic components and damage their O rings and seals
- Check the pressure shown on the regulator gauge, which should normally read around 25 kg when the air is properly filled and flowing
- Put the PLC into hand mode
- Move the mould to the open position using the mould open option
- Lock the mould using the VRA, which stands for Valve Regulator Assembly, before beginning installation
- This lock is an important safety step, since it prevents the mould from opening or closing accidentally while someone is working on it, which could otherwise cause injury
- Engage the pointed section of the mould with the front plate
- Fit the mould correctly into the locating pin
- Install the initial bolts diagonally, one on each side
- Do not tighten these bolts fully at this stage
- Check that there is an equal gap on both sides so the mould sits centred, rather than tightening one side more than the other
- Install the locking strips on both sides to hold the mould in place
- Release the VRA lock only at the correct point in the sequence, since the mould will not close while the lock is engaged
- Use the PLC in hand mode to close the mould
- Install the rear bolts diagonally, in the same cross pattern used at the front
- Check that the mould is centred, and if it is not, loosen the bolts slightly and shift the mould until it sits evenly on both sides
- Once centred, tighten all four bolts fully
- Remove the temporary locking strips before opening the mould again
- Leaving the locking strips fitted can damage the rear cylinder shafts when the mould is opened, so this step should never be skipped
How to Align the Stretching Rod in a Semi Auto Blow Molding Machine
- Even with the mould fitted correctly, the bottle will not form properly unless the stretching rod is also aligned
- An off centre rod can cause an off centre bottle with an improperly formed or whitened base
- Shut off the compressor air from the valve at the back of the machine before making any manual adjustment
- Use the pre blow and high blow controls on the PLC to release the remaining air inside the valve
- With the internal air released, the stretching rod can be moved up and down by hand
- Loosen the two cylinder bolts and adjust both stretching rods so they sit in the centre of the mould cavity
- Retighten the bolts once the rods are properly centred
- Rod height needs to be adjusted according to the specific mould and bottle size, such as 500 ml, 1 litre or 250 ml
- Loosen the relevant bolts using a 34 or 36 spanner, or an adjustable wrench or pipe wrench if that size is not available
- Lower the rod and plate so the rod touches the mould completely at this stage, and set the limit position at this point
- Move the rod slightly upward, so it stops about 2 mm above the mould rather than touching it completely
- Direct contact between the rod and the mould can damage the mould cavity and prevent the bottle from forming properly, so this clearance matters
- Once the height is set correctly, tighten the adjustment bolts completely
Final Checks Before Restarting Semi Auto Blow Molding Machine Production
Before starting production again, confirm the following:
- The mould is properly centred
- All required bolts, front and back, are fully tightened
- The temporary locking strips have been removed
- The VRA lock has been returned to its correct operating position
- Both stretching rods are centred and properly adjusted for the bottle size being produced
- Heating is set correctly for the preform and bottle being used
- Conveyor speed is set correctly
- Timers are set correctly for the selected bottle capacity
 Email Us Now!
When to Contact DTPPL for Semi Auto Blow Molding Machine Technical Assistance
If a sealing rubber replacement, valve cleaning or mould alignment does not resolve the issue, or if you are uncertain about any step in the process, it is best to contact DTPPL directly rather than continuing on your own. This is especially important for valve dismantling and mould or stretching rod alignment, which should only be carried out by trained personnel. DTPPL’s team can also guide you on which spare and consumable parts to keep in stock, and how much of each, so that a worn part does not bring your production line to a stop.
OUR OTHER PRODUCT
Conclusion
Consistent bottle formation on a semi auto blow molding machine for a mineral water plant depends on a handful of components being maintained correctly. Regular inspection and timely replacement of the sealing rubber prevents air leakage during blowing. Keeping the low pressure and high pressure valve assembly clean, with intact O rings and seal kits, allows the machine to control air pressure the way it should. Correct mould installation, with proper centring and safe use of the VRA lock, protects both the operator and the equipment. Finally, accurate stretching rod alignment, both centred and at the right height, ensures the bottle base forms properly every time. Following these procedures carefully, and reaching out to DTPPL when a problem goes beyond routine maintenance, helps mineral water plant teams keep their production line running smoothly.
Frequently Asked Questions About Semi Auto Blow Molding Machine Maintenance
How does damaged sealing rubber affect a semi auto blow molding machine's bottle blowing?
When the sealing rubber’s surface is worn or uneven, air escapes around it instead of going into the bottle. Without enough air reaching the bottle, it either fails to blow or forms incorrectly.
How often should sealing rubber be inspected in a semi auto blow molding machine?
It should be checked every 10, 15 or 20 days, and at least once a month. If it is not in good condition at the time of inspection, it should be replaced immediately.
Why should a semi auto blow molding machine's air and power be switched off before valve cleaning?
The LP and HP valve assembly is a pressurised, electrically connected part of the machine. Shutting off the air supply and power before opening it is a necessary safety step, and this work should only be carried out by trained personnel.
What can prevent the LP and HP valves in a semi auto blow molding machine from controlling pressure correctly?
A cut O ring or a damaged seal kit inside the valve can cause it to get bypassed, so it can no longer regulate low pressure and high pressure air properly.
Why must mould bolts be fitted diagonally when installing a mould in a semi auto blow molding machine?
Fitting the initial bolts diagonally, without tightening them fully, allows the mould to be checked and adjusted for an equal gap on both sides before it is locked into its final, centred position.
Why should the stretching rod remain centred in a semi auto blow molding machine's mould?
If the stretching rod is off centre, the bottle can form off centre as well, with an improperly shaped or whitened base.
What should be checked before restarting production on a semi auto blow molding machine?
Confirm the mould is centred and fully bolted, the locking strips are removed, the VRA lock is back in its operating position, the stretching rods are centred and adjusted, and heating, conveyor speed and timers are all set correctly for the bottle being produced.
Our associates











































Director – Global Marketing and Sales
Mr. Bhavesh from Dharmanandan Techno Projects Pvt. Ltd. has played a pivotal role in elevating the DTPPL brand to the global stage, leveraging his exceptional expertise in marketing and communications. He is committed to helping clients achieve significant growth while strengthening their own brands. Dharmanandan Techno Projects Pvt. Ltd. is a leading manufacturer and supplier of water purification systems and turnkey solutions for mineral water plants. With years of experience in designing and delivering high-quality water treatment solutions, the company provides end-to-end services, including system design, installation, maintenance, and ongoing support. Specializing in scalable and customizable water plants, DTPPL has successfully served industries worldwide, ensuring clean and safe drinking water across diverse applications.