




Listening Article
Table of Contents
Semi Auto Blow Molding Machine FAQs for Particle Lines, Faulty Switches and White Bottles
September 21, 2026
AI Summary
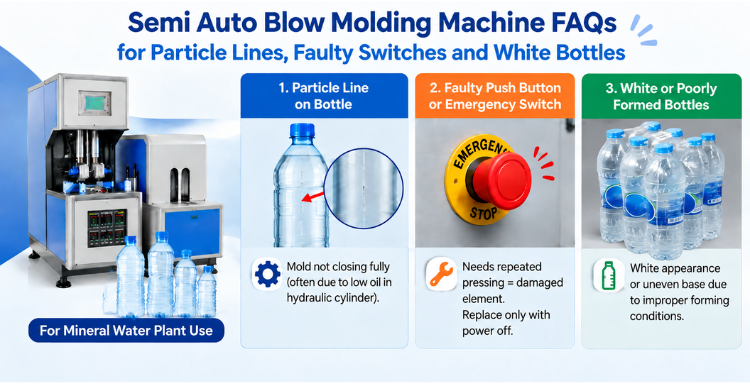
A semi auto blow molding machine for mineral water plant use can run into three recurring problems: a visible line on the bottle, a faulty push button or emergency switch, and white or poorly formed bottles with uneven bases. A particle line usually means the mold is not closing fully, often due to low oil in the hydraulic cylinder. A push button that needs repeated pressing signals a damaged element inside it and should only be replaced with the power off. White bottles and widened bases are almost always linked to incorrect heater settings. Each problem has a clear cause and a defined corrective step, but electrical and hydraulic work should be handled by trained personnel, with DTPPL’s support called in when needed.
 Call Now!
Understanding the Semi Auto Blow Molding Machine in a Mineral Water Plant
A semi auto blow molding machine for mineral water plant use is central to the PET bottle and jar making process. Dharmanandan Techno Projects Pvt. Ltd. (DTPPL) offers semi automatic PET blow molding machines and PET stretch blow molding machines built with pneumatic and hydro pneumatic systems for better, faster output, commonly used to manufacture mineral water jars from 5 liters to 20 liters.
Because the machine runs continuously through heating, mold closing and blowing cycles, small issues in any one stage can affect the finished bottle. DTPPL manufactures and services this equipment and has put together practical troubleshooting guidance so operators can identify and resolve common issues quickly and safely.
Why Does a Particle Line Appear on the Bottle in a Semi Auto Blow Molding Machine?
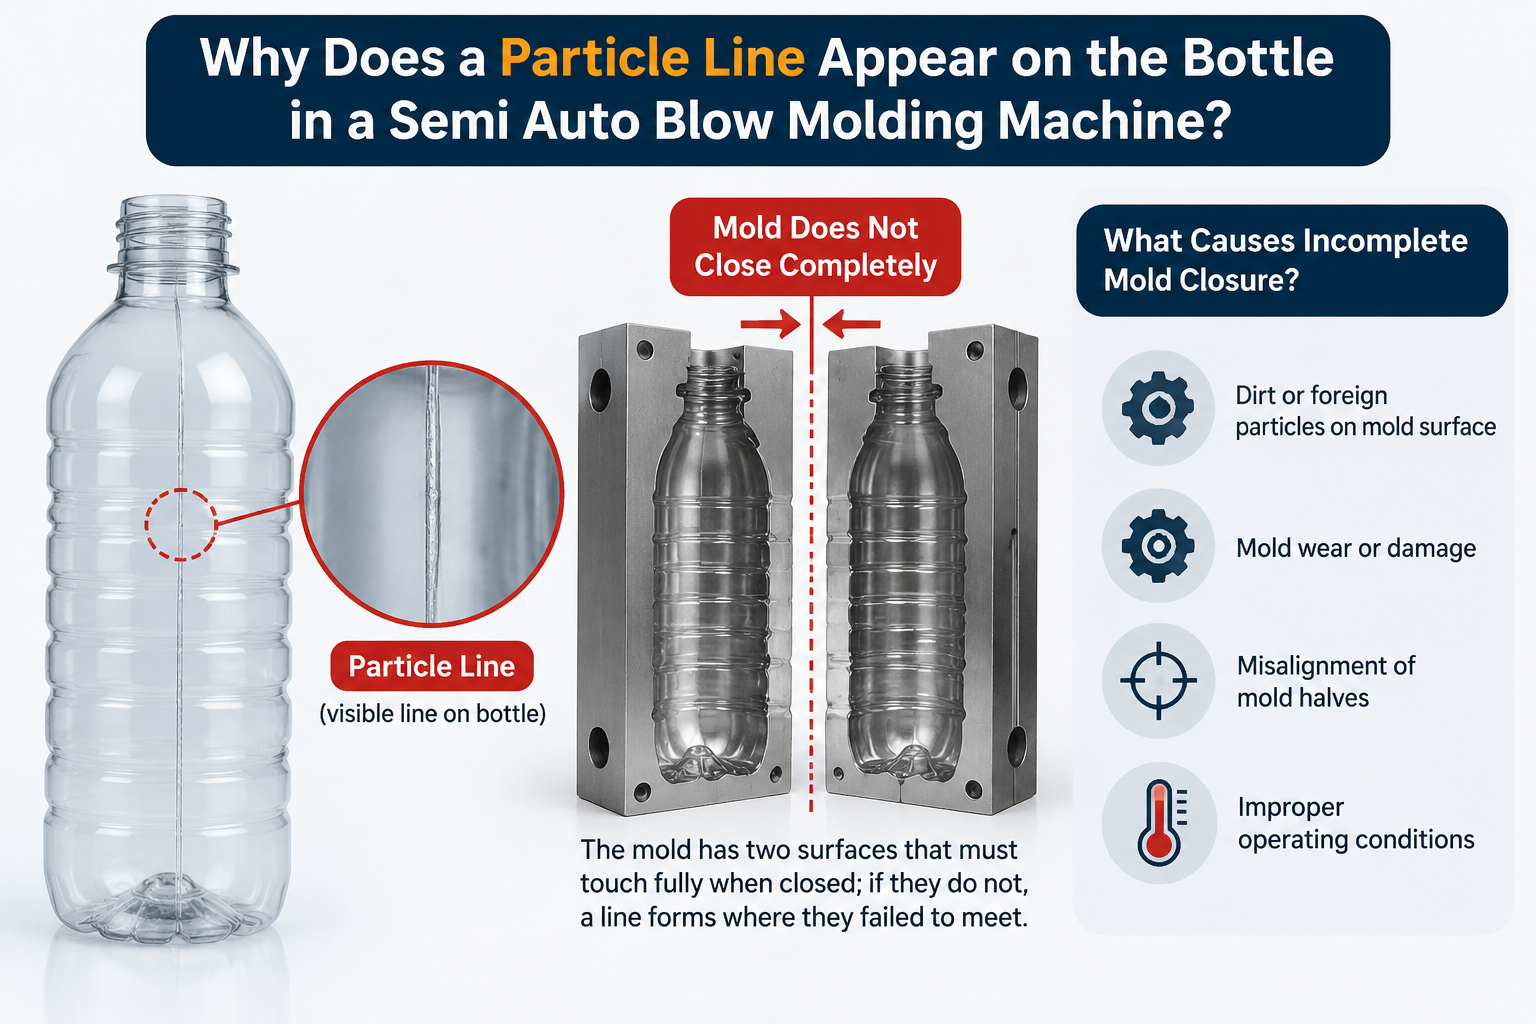
A visible line, or particle line, on a finished PET bottle is a common issue in semi automatic blow moulding machine operation. It appears when the mold does not close completely. The mold has two surfaces that must touch fully when closed; if they do not, a line forms where they failed to meet.
What causes incomplete mold closure The mold is held closed by a hydraulic cylinder that keeps pressure on the plate so the mold cannot open during blowing. The cylinder runs on hydraulic oil number 32. When the oil level drops, the cylinder cannot maintain enough pressure, the mold does not close fully, and the particle line appears.
Checking and topping up the cylinder oil Before checking or filling the cylinder, the mold must be in the open position, never while it is closed. With the mold open, the cylinder is fully extended and can be opened safely.
This procedure should be followed:
- Use an adjustable wrench to open the rod at the top of the cylinder, holding the fitting steady with a second wrench
- Fill hydraulic oil number 32 completely until it reaches the top
- Wait briefly for trapped air to escape, then recheck the level and top up if needed
- Close the cylinder and tighten the connection fully with the adjustable wrench so no oil leaks out
- If air has entered the system, drain the oil from the drain point at the bottom and refill with fresh oil
This is a hydraulic maintenance task and should only be carried out by someone trained on the machine. DTPPL recommends checking the cylinder oil level every month, whether or not a line has appeared, to keep the mold closing fully and prevent recurrence.
OUR OTHER PRODUCT
How to Change a Faulty Push Button on a Semi Auto Blow Molding Machine Safely
Push buttons on the control panel are pressed frequently during daily operation. Repeated forceful pressing can damage or loosen the element behind the button. A button is likely faulty if it needs pressing several times, sometimes four or five, before the machine responds.
Before any electrical work, switch off the machine’s power supply completely. Do not attempt this while the machine is powered on. Follow this replacement process:
- Open the control panel cover using a number 5 Allen key, removing the bolts on both sides
- Unscrew the central bolt holding the element and carefully remove it along with its wires
- Replace the damaged element with a new one of the same type, an NO element must only be replaced with another NO element
- Reconnect the wires to either terminal, one carries phase and the other neutral
- Ensure every wire connection is tightened properly so nothing is loose
Electrical replacement work of this kind should be completed only by a properly trained and authorised person.
How to Check and Replace the Emergency Switch on a Semi Auto Blow Molding Machine
The emergency switch stops the machine instantly, in whatever position it is in, during an accident or a problem needing immediate attention. If it does not disengage properly, the heater will not turn on and no part of the machine will operate.
The emergency switch uses an NC element, identified by its red colour. An NC element must only be replaced with another NC element, never an NO element. The replacement follows the same safety steps as the push button:
- Switch off the power supply before starting
- Open the central bolt and carefully remove the damaged element
- Fit a new NC element in its place
- Tighten every wire connection properly
Because it is a safety device, this replacement should only be performed by a trained and authorised person.
What Causes White and Improperly Formed Bottles in a Semi Auto Blow Molding Machine?
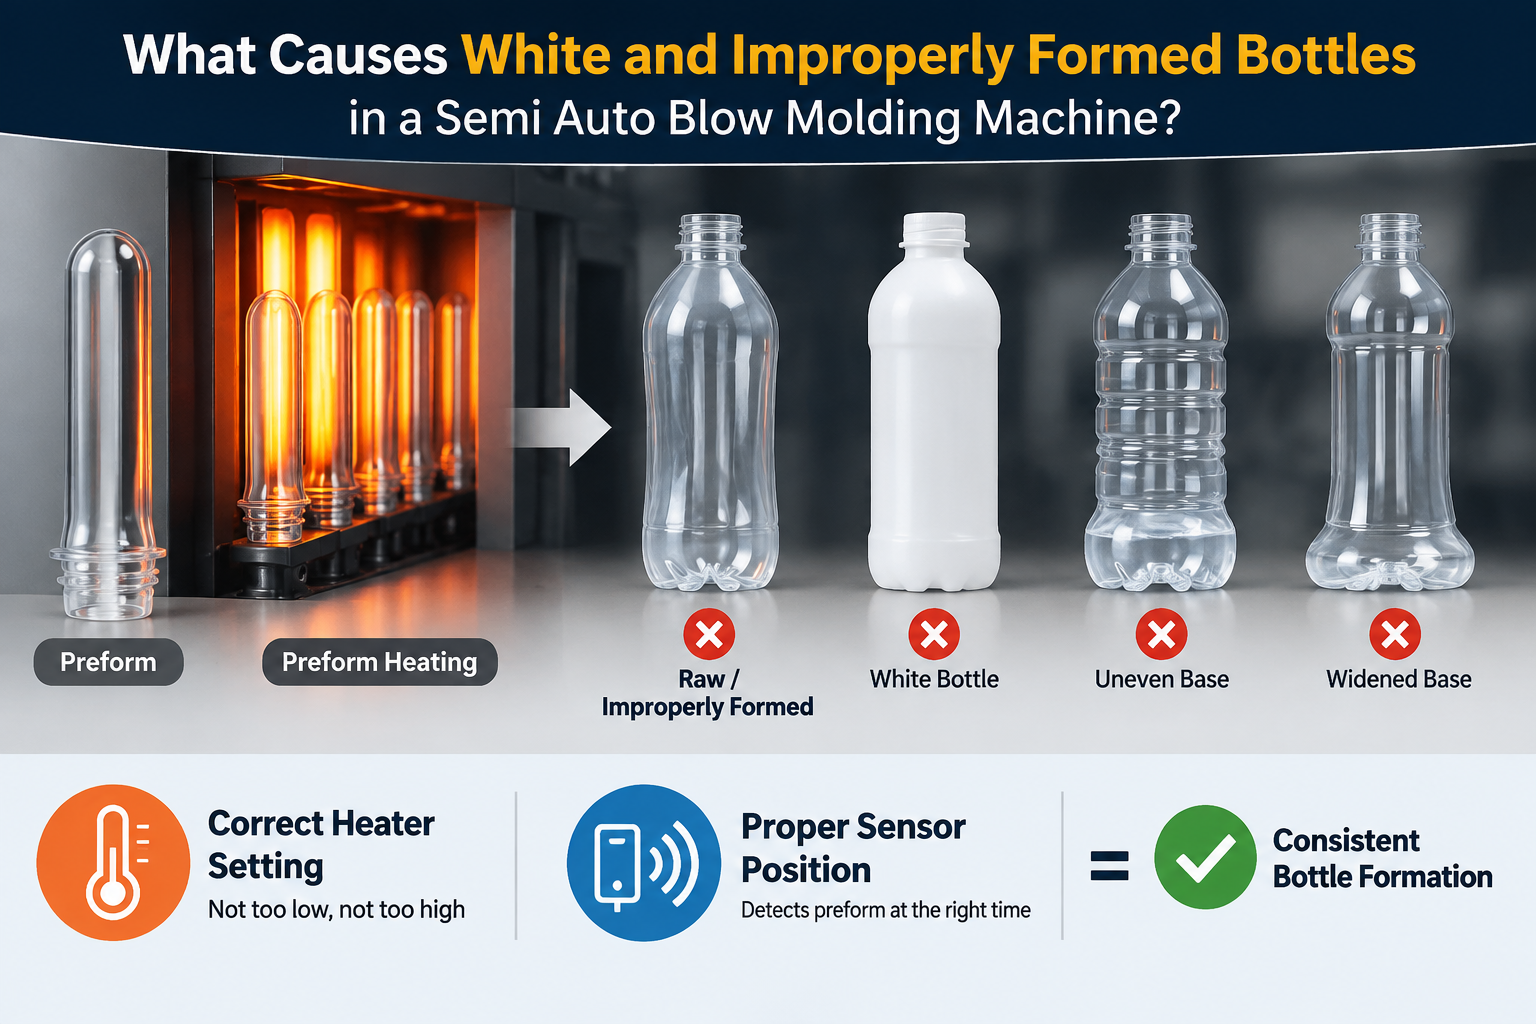
White bottles, raw or improperly formed bottles, and bottles with an uneven or widened base are usually connected to how the preform is heated. If the heater is not set properly the preform can remain raw and will not form into a proper bottle. If heating is excessive, the preform turns white and also fails to form correctly. The same incorrect heating can cause an uneven or widened base. Getting the heater setting right and the sensor correctly positioned are the two factors behind consistent bottle formation.
Read Our Article
Why India’s Top Corporate Leaders Trust Our Mineral Water Plants
How to Check the Heating and Temperature Settings of a Semi Auto Blow Molding Machine
The temperature controller displays and manages the heat inside the heating chamber, within a general range of 70 to 80. Once a temperature is set, the controller’s fan switches on automatically when the internal temperature rises above the set level, and switches off once it falls back below it.
A sensor inside the heating chamber reads the internal temperature and sends this reading to the controller. It must remain in its correct position; if pushed too far inside or set too high, it gives an incorrect reading, leading to a raw, white or poorly formed bottle.
Heater settings can also be adjusted through the PLC interface, under the heater function. Arrow controls move the selection left and right, a sensor style control moves it up and down, and plus and minus buttons adjust the value, the upper row in steps of 10 and the lower row in steps of 1.
Heating should always be set according to the preform and bottle in use, following the machine manual and DTPPL’s guidance when required.
Client Review
“This company provided reliable guidance for semi auto blow molding machine maintenance and mould change procedures. DTPPL's technical support helped us understand safe practices and improve machine handling.”
– Ravi Mathhai
Preventive Maintenance Checklist for Semi Auto Blow Molding Machine Operators
Use these checks regularly to reduce the problems covered in this guide.
- Check the hydraulic cylinder oil level every month, topping up with hydraulic oil number 32 if needed
- Keep the mold open before any hydraulic cylinder check or oil fill
- Train operators to press push buttons normally, without excessive force
- Switch off the power supply before any electrical work on push buttons or the emergency switch
- Check that wire connections behind push buttons and the emergency switch remain tight
- Confirm the temperature sensor stays in its correct position
- Review heater settings on the controller and PLC according to the preform and bottle in use
- Follow the blow moulding machine manual and DTPPL’s checklist for routine inspection

When to Contact DTPPL for Semi Auto Blow Molding Machine Technical Support
Operators should contact DTPPL when the cause of a problem is not clear, when the work involves electrical wiring beyond an operator’s training, or when a problem continues after the checks in this guide. As the automatic blow molding machine manufacturer and service provider for these machines, DTPPL’s service team is available to guide plant owners through more complex issues.
OUR OTHER PRODUCT
Semi Auto Blow Molding Machine Maintenance: Conclusion
Consistent bottle quality depends on three things, a mold that closes fully, control switches that respond properly, and heater settings suited to the preform in use. A low hydraulic oil level, a worn push button or emergency switch element, and incorrect heating all lead to visible, preventable problems.
Most of these issues can be avoided with regular preventive checks, proper operator training and adherence to the machine manual. Where a problem cannot be resolved safely by an operator, particularly electrical work, DTPPL’s technical support is available to help plant owners keep their semi auto blow molding machine for mineral water plant running reliably.
 Email Us Now!
Semi Auto Blow Molding Machine Frequently Asked Questions
Why does a particle line appear on a PET bottle in a semi auto blow molding machine?
A particle line appears when the mold does not close completely, usually because low oil in the hydraulic cylinder reduces the pressure needed to hold the mold shut.
Which hydraulic oil is recommended for a semi auto blow molding machine's cylinder?
DTPPL recommends hydraulic oil number 32 for the cylinder that holds the mold closed.
How often should the hydraulic cylinder oil level be checked on a semi auto blow molding machine?
DTPPL recommends checking the cylinder oil level every month as part of routine preventive maintenance.
How can an operator identify a faulty push button on a semi auto blow molding machine?
A push button is likely faulty if it needs to be pressed several times before the machine responds, which points to a damaged element behind it.
What is the difference between the push button and emergency switch elements on a semi auto blow molding machine?
The push button uses an NO element, while the emergency switch uses an NC element. Each must be replaced only with the same type of element.
Why does a PET bottle become white during blow moulding in a semi auto blow molding machine?
Excessive heating makes the preform white, and a white preform does not form into a proper bottle. Insufficient heating has the opposite effect, leaving the preform raw.
Why is the temperature sensor position important in a semi auto blow molding machine?
The sensor reads the internal heating chamber temperature. If it is placed too far inside or too high, it gives an incorrect reading, leading to improperly heated preforms and poorly formed bottles.
Our associates










































Director – Global Marketing and Sales
Mr. Bhavesh from Dharmanandan Techno Projects Pvt. Ltd. has played a pivotal role in elevating the DTPPL brand to the global stage, leveraging his exceptional expertise in marketing and communications. He is committed to helping clients achieve significant growth while strengthening their own brands. Dharmanandan Techno Projects Pvt. Ltd. is a leading manufacturer and supplier of water purification systems and turnkey solutions for mineral water plants. With years of experience in designing and delivering high-quality water treatment solutions, the company provides end-to-end services, including system design, installation, maintenance, and ongoing support. Specializing in scalable and customizable water plants, DTPPL has successfully served industries worldwide, ensuring clean and safe drinking water across diverse applications.