




Listening Article
Table of Contents
3 Cavity Auto Blow Molding Machine: How to Prevent Production Interruptions?
September 28, 2026
AI Summary
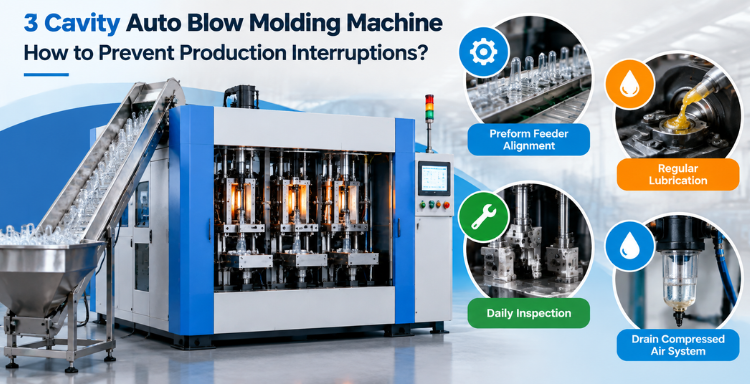
Proper maintenance of your 3 Cavity Auto Blow Molding Machine ensures reliable production and extends component life. Start with correct preform auto feeder alignment so preforms flow continuously into the heating section. Perform weekly lubrication of all moving shafts and daily inspection of gripper, catcher and stretching rod bolts. Drain water from the compressed air system daily to prevent valve and pneumatic damage. Monitor reed switch indicator lights to confirm pneumatic cylinder position signals. Finally, maintain your accessories compressor with daily oil checks and water drainage, weekly filter cleaning, and quarterly oil replacement. Consistent attention to these maintenance tasks prevents production interruptions and keeps your mineral water plant equipment running smoothly.
Understanding 3 Cavity Auto Blow Molding Machine Maintenance
Organized maintenance of your 3 Cavity Auto Blow Molding Machine prevents small issues from becoming costly breakdowns. When the preform auto feeder drifts out of alignment, preforms stop moving smoothly into the heating section. Without weekly shaft lubrication, moving components wear quickly and may fail. Loose bolts gradually loosen further as the machine cycles. Water in the compressed air supply damages pneumatic valves and cylinders. When reed switches stop signaling correctly, the machine cannot complete its automatic cycle. When the compressor lacks regular care, it creates less reliable air supply.
Dharmanandan Techno Projects Pvt. Ltd. (DTPPL) manufactures automatic PET blow moulding machines for mineral water plants and beverage packaging lines. Their expertise in machine design and maintenance guidance helps plant owners understand why each maintenance task matters and how to keep their 3 Cavity Auto Blow Molding Machine operating reliably for years.
How to Check the Preform Auto Feeder Setting in Your 3 Cavity Auto Blow Molding Machine
The preform auto feeder guides preforms continuously from the supply into the heating section. When the feeder setting drifts, preforms either stop moving or move awkwardly. The upper guide plate plays a critical role in this process.
The preform should touch the upper guide plate and travel straight as it moves forward. If the plate sits too high, the preform loses proper guidance and stops moving continuously. If the plate presses the preform too firmly, the preform cannot move freely. When movement becomes jerky or interrupted, extra strain builds on the feeder gearbox, which can lead to mechanical problems.
To check whether your feeder setting is correct, observe whether preforms enter the heating section in a smooth, continuous flow. If preforms hesitate, bunch up, or stop completely, the guide plate likely needs adjustment.
How to Adjust the Preform Guide Plate on Your 3 Cavity Auto Blow Molding Machine
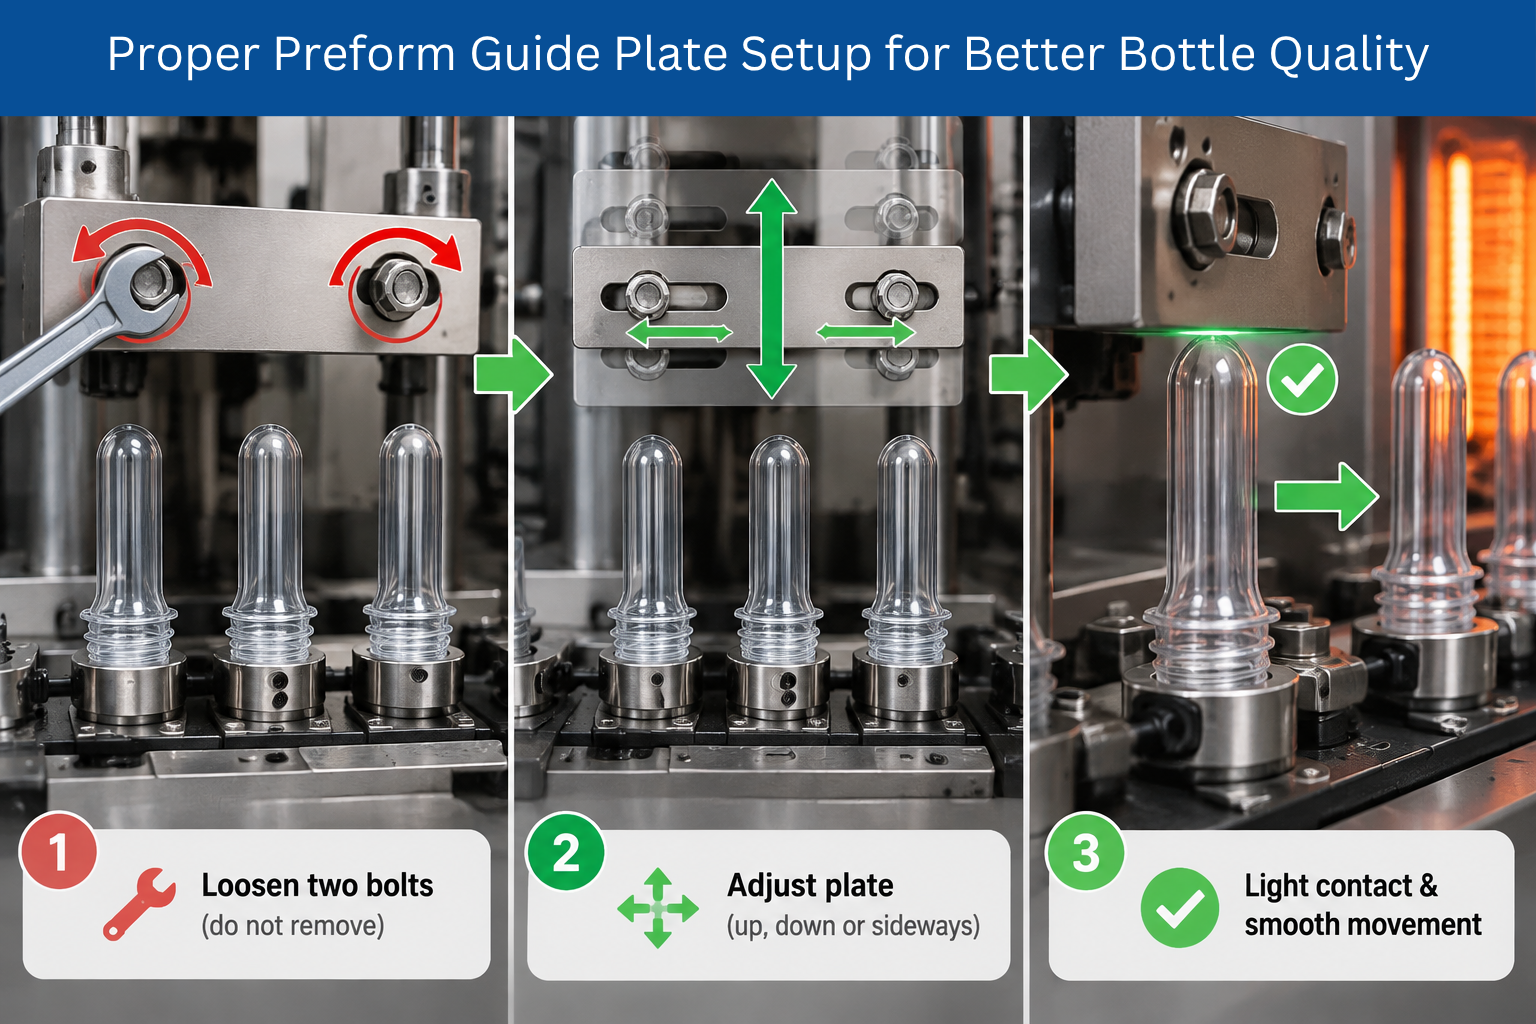
Adjusting the preform guide plate requires loosening two bolts that hold the plate in position. These bolts allow the plate to move up, down or sideways.
First, loosen the two bolts. Do not remove them entirely. Then adjust the upper plate so it makes light contact with the preform as the preform moves forward. The preform should travel straight and smoothly into the heating section without pressing hard against the plate.
Once the preform flow looks continuous and smooth, retighten the two bolts firmly. The adjustment is complete when preforms enter the heating section in a steady stream without hesitation. This simple adjustment prevents many production problems and protects your gearbox from unnecessary strain.
Daily Maintenance Checklist for the 3 Cavity Auto Blow Molding Machine
Before starting production each day, perform these essential checks to keep your fully auto PET blow molding machine running smoothly.
Bolt Inspection and Tightening:
Machine movement and vibration gradually loosen fasteners. Check the gripper bolts, catcher bolts, and stretching rod bolts before each start. Inspect other accessible fasteners according to your machine checklist. Tighten any loose bolts according to approved procedures. When bolts remain tight, fastener related problems are prevented before they occur.
Water Drainage from Compressed Air:
Compressed air carries moisture from the atmosphere into your machine. If water accumulates in the air supply system, it damages pneumatic valves, O rings and other valve components. When the plant shuts down, open the receiver tank drain valve to release water that has collected inside. This daily drainage prevents moisture from entering sensitive valve assemblies and pneumatic actuators.
Air Supply Startup Procedure:
When you restart the 3 Cavity Auto Blow Molding Machine in the morning, open the compressed air valve slowly. Allow air to enter gradually into the system. Open the valve just a little at first, then slowly increase the opening. This gradual pressure increase protects pneumatic components from sudden pressure shock. If you open the valve suddenly and fully, the sudden full pressure can damage valve seals and pneumatic cylinder components. Slow startup is a simple step that prevents expensive damage.
Operating Check:
After starting the machine, observe the preform feeder, mould movement and air discharge. Listen for unusual noise. Watch for visible leakage around cylinders or air lines. If you notice anything abnormal, stop the machine and investigate before continuing production.
 Call Now!
OUR OTHER PRODUCT
Weekly Oiling and Greasing Checklist for the 3 Cavity Auto Blow Molding Machine
The blow molding machine’s moving shafts require weekly lubrication to function smoothly. Without regular oiling, shafts wear quickly and movement becomes rough or stalls.
Identify and lubricate these shafts:
The front and rear shafts that control preform movement require weekly oiling. The shafts associated with mould movement include two upper shafts and two lower shafts that guide the moulds up and down. Apply lubricant carefully to each moving shaft according to the approved schedule.
Follow the maintenance intervals and lubricant types specified in your machine manual. The correct lubricant, applied in the correct quantity, ensures proper functioning without attracting dust or debris. Regular shaft lubrication reduces friction, extends component life and improves overall machine performance.
How the Reed Switch Controls Pneumatic Cylinder Movement in Your 3 Cavity Auto Blow Molding Machine
A reed switch is a sensor that detects the position of a pneumatic cylinder. Understanding how the reed switch works helps you recognize when cylinder problems are actually reed switch problems.
The reed switch is positioned near the end of a pneumatic cylinder. Inside the cylinder moves a magnetic component. As the cylinder moves, the magnetic component approaches the reed switch. When the magnetic part comes close, the reed switch senses it and sends a signal. An indicator light on the machine lights up to show that the cylinder has reached the detected position.
The PET blow molding machine uses these position signals to continue its automatic operating sequence. When a cylinder moves upward, an upper reed switch detects the top position and its indicator lights. When the cylinder returns downward, a lower reed switch detects the bottom position and its indicator lights.
If the machine does not receive the position signal, it cannot continue the next step. For example, if a cylinder moves upward but the upper reed switch does not signal, the machine cannot proceed to the next action. If a cylinder tries to move downward but the lower reed switch signal is absent, the downward movement may not complete.
Client Review
“DTPPL’s 3 Cavity Auto Blow Molding Machine provides smooth operation, consistent bottle output, and dependable performance for our mineral water production.”
– Aishwarya Deshpande
How to Check a Reed Switch Problem in Your 3 Cavity Auto Blow Molding Machine
When a pneumatic cylinder completes one movement but fails to complete the next movement, a reed switch problem is often the cause.
Check whether the indicator light turns on when the cylinder reaches its upper limit. Does the light turn on when the cylinder reaches its lower limit? If the upper light turns on but the lower light does not, the lower reed switch may not be detecting the cylinder position correctly.
Check whether the reed switch itself is properly positioned near the cylinder. If the reed switch has moved out of position, it cannot sense the magnetic component. Check whether the indicator light responds immediately when the cylinder reaches each position.
If an indicator light does not respond when the cylinder reaches its limit, the reed switch requires inspection or repositioning. Do not attempt to bypass the reed switch or disable its safety function. Contact a qualified technician if the reed switch signal remains absent after checking the switch position and light function.
Daily and Weekly Compressor Maintenance for Your 3 Cavity Auto Blow Molding Machine
Your accessories compressor supplies clean, dry compressed air to pneumatic components. Consistent compressor maintenance prevents moisture and contaminants from entering your machine.
Daily Checks:
Check the compressor lubrication oil level before starting. Verify that the oil level sits in the normal operating range. Drain accumulated water from the receiver tank daily when the plant shuts down. Open the receiver drain valve to release water. Observe the compressor while it runs. Listen for unusual noise or vibration that differs from normal operating sound. If you hear strange noise or feel abnormal vibration, inform the maintenance team immediately before continuing operation. Check that the correct electrical supply reaches the compressor before starting. Verify the input supply voltage according to your compressor documentation and the equipment nameplate.
Weekly Checks:
Inspect the entire compressor for oil leakage. Check around seals, bolt connections and the bottom of the unit. If you see oil dripping or staining, inform the service team. Verify that the safety valve inside the compressor is functioning correctly. The safety valve prevents excessive air pressure from building up inside the compressor tank. If the safety valve fails, pressure can build dangerously. Check whether the compressor bolts remain tight after a week of running. Machine vibration can loosen fasteners. Tighten any loose bolts according to the approved procedure. Inspect and clean the air filters visible on the machine. These filters draw outside air into the compressor. If dust accumulates on the filters, particles enter the compressor and travel into your 3 Cavity Auto Blow Molding Machine. Clean the filters weekly or every 15 days to prevent dust contamination.
Monthly and Periodic Compressor Maintenance for Your 3 Cavity Auto Blow Molding Machine
Monthly Checks:
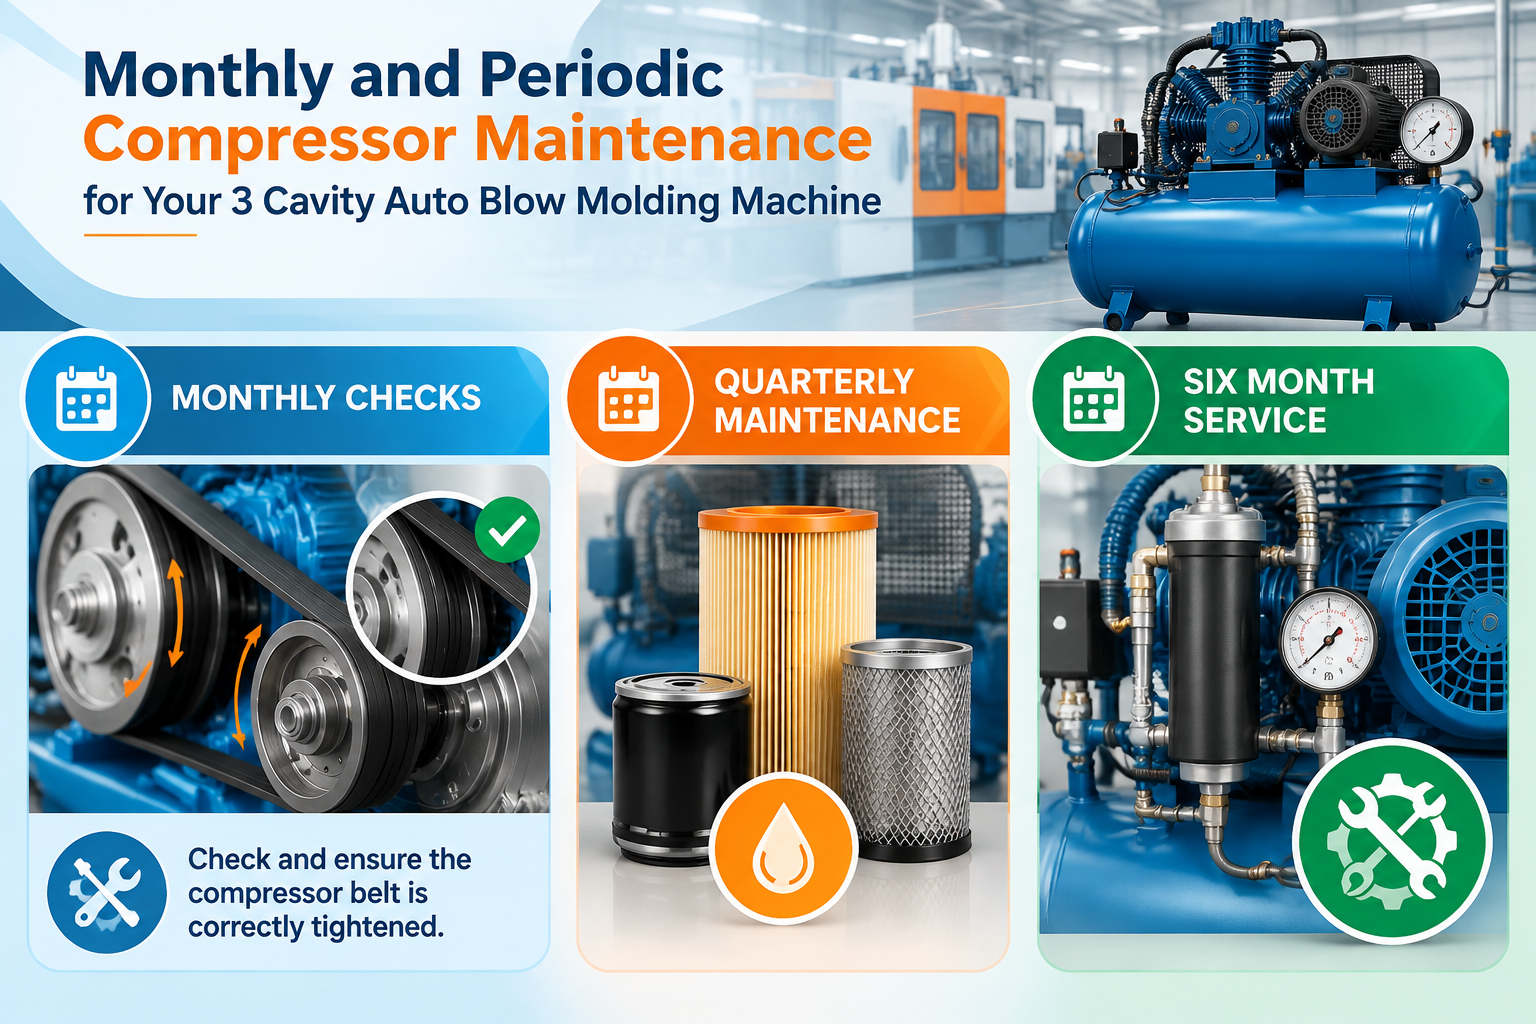
Verify that the compressor belt remains correctly tightened. A loose belt reduces compressor output and creates slippage and heat. A properly tightened belt ensures efficient compressor operation and reliable air supply to your machine.
Quarterly Maintenance:
Change the compressor oil every three months according to the manufacturer’s schedule. Old oil loses its lubricating ability and allows metal particles to circulate through the compressor. Fresh oil protects moving parts and maintains compressor efficiency. Replace the dryer filter every three months. The dryer filter collects moisture and particles from the compressed air. A clogged filter reduces dryer performance and allows moisture to enter your 3 Cavity Auto Blow Molding Machine.
Six Month Service:
Have the compressor serviced by a qualified technician after six months of operation. This comprehensive service checks internal components and prevents problems before they cause production losses.
How to Check the Air Dryer on Your 3 Cavity Auto Blow Molding Machine
The air dryer removes moisture from compressed air before it reaches your blow molding machine. Moisture in compressed air damages pneumatic valves and cylinders.
Confirm that the dryer valve is functioning correctly. When the dryer operates normally, water drains away smoothly. Check whether moisture and air are being discharged correctly from the dryer outlet. If water is not draining, the dryer valve may be stuck or blocked.
Inspect the internal filter inside the dryer. The filter element collects moisture and particles. If the filter becomes saturated with water, it no longer removes moisture effectively. Replace the dryer filter every three months to maintain proper moisture removal.
Ensure that accumulated water does not pass into the 3 Cavity Auto Blow Molding Machine. If the dryer fails to drain water, shut down the machine until the dryer is repaired. Water entering the machine damages valves and creates production problems.
Maintenance Warning Signs That Require Technical Support for Your 3 Cavity Auto Blow Molding Machine
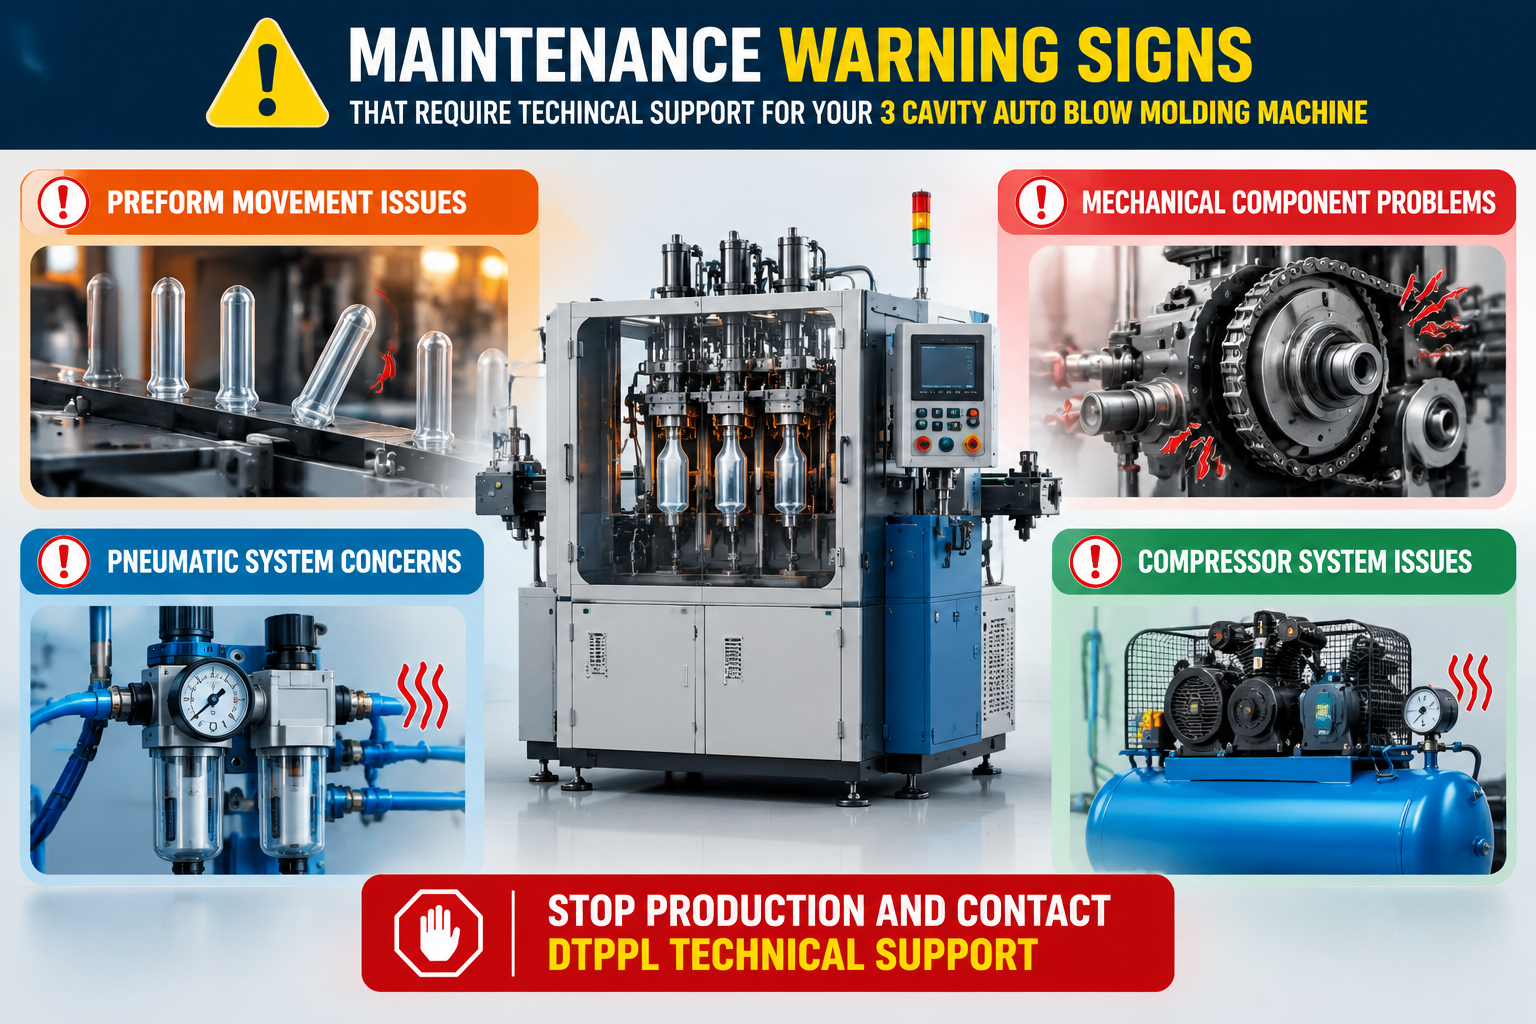
Stop production and contact DTPPL technical support if you observe any of these warning signs:
Preform Movement Issues:
Preforms stop moving continuously into the heating section. Preforms repeatedly jam or hesitate in the feeder. Movement becomes jerky or uneven despite feeder adjustments.
Mechanical Component Problems:
Unusual or abnormal gearbox sound. Loose gripper components, stretching rods or other moving parts that rattle.
Pneumatic System Concerns:
Water visible in air lines or appearing at the machine outlet. Pneumatic cylinders moving partway up or down and stopping. Reed switch indicator lights not responding when cylinders reach their positions. Pneumatic components failing to complete their movement cycle.
Compressor System Issues:
Oil dripping or leaking from the compressor unit. Abnormal noise or unusual vibration from the compressor. Concerns about the safety valve functionality. Dryer failing to drain water or not removing moisture effectively.
OUR OTHER PRODUCT
When to Contact DTPPL for Technical Assistance with Your 3 Cavity Auto Blow Molding Machine
Contact Dharmanandan Techno Projects Pvt. Ltd. for professional technical support when:
The cause of a problem remains unclear after checking the items in this guide. Feeder adjustments do not restore preform movement to continuous, smooth operation. A reed switch signal remains absent after you have verified the switch position and checked the indicator light. A pneumatic cylinder does not complete its full upward or downward cycle. Compressor problems, safety valve concerns, or dryer malfunctions require assessment by a qualified technician. Maintenance or repairs involve electrical circuits, internal compressor components, or machine interlocks.
Contacting a qualified technician promptly prevents small issues from becoming major breakdowns that interrupt your production schedule and damage expensive components. DTPPL’s service team has extensive experience with automatic blow moulding machines and can provide rapid solutions to keep your mineral water plant operating efficiently.
 Email Us Now!
Conclusion
Organized maintenance keeps your 3 Cavity Auto Blow Molding Machine running smoothly and reliably. Begin with correct preform auto feeder alignment so preforms flow continuously into the heating section. Inspect and tighten fasteners daily to prevent mechanical looseness. Drain water from your compressed air supply daily to protect pneumatic components. Perform weekly shaft lubrication and filter cleaning. Monitor reed switch indicator lights to confirm pneumatic cylinder position signals. Maintain your compressor with daily oil checks and water drainage, weekly filter cleaning, and quarterly oil replacement.
These maintenance tasks are practical, straightforward and directly prevent the most common production interruptions. When equipment receives consistent attention, breakdowns become rare, production runs smoothly and component life extends significantly. A well maintained 3 Cavity Auto Blow Molding Machine becomes a reliable asset that delivers consistent output and supports profitable mineral water production operations.
Frequently Asked Questions About 3 Cavity Auto Blow Molding Machine Maintenance
Why do preforms stop moving continuously into the heating section?
Preforms stop moving when the upper guide plate position drifts. If the plate sits too high, the preform loses guidance and cannot move smoothly. If the plate presses too firmly, the preform becomes stuck and cannot advance. Loosen the two adjustment bolts and reposition the plate so the preform touches it lightly as it travels straight into the heating section. Correct alignment ensures continuous preform flow.
How should the upper guide plate contact the preform during operation?
The preform should touch the upper guide plate as it moves forward. The contact should be light and guiding, not pressing firmly. The preform should travel straight into the heating section without resistance. If contact is too loose, the preform will not be guided correctly and may jam. If contact is too firm, the preform will not move continuously and strain will build on the feeder mechanism.
Which machine parts require weekly oiling and greasing in the 3 Cavity Auto Blow Molding Machine?
Oil and grease the front and rear shafts weekly. Lubricate the two upper shafts and two lower shafts that control mould movement. These shafts enable the automatic drop and lift cycle of the moulds. Follow the lubricant types and quantities specified in your machine manual. Apply lubrication carefully to moving surfaces and avoid over lubrication, which attracts dust.
Why should the compressed air valve be opened slowly when starting the 3 Cavity Auto Blow Molding Machine?
Opening the air valve slowly allows pressure to build gradually into the pneumatic system. If you open the valve suddenly, full pressure hits pneumatic components immediately and can damage valve seals and O rings. Slow opening protects sensitive pneumatic parts from pressure shock and ensures smooth system activation. Always use the gradual startup procedure.
What does a reed switch do in the 3 Cavity Auto Blow Molding Machine and why is it important?
A reed switch detects the position of a pneumatic cylinder using a magnetic sensor. When the cylinder reaches its upper or lower limit, the reed switch senses the magnetic component and signals that position. An indicator light turns on to show the signal. The machine needs these position signals to continue its automatic operating cycle and complete the blow moulding sequence. A faulty reed switch stops the automatic cycle.
How often should the compressor oil and dryer filter be changed in the accessories compressor for your machine?
Change the compressor oil every three months according to the manufacturer’s schedule to maintain proper lubrication and protect internal components. Replace the dryer filter every three months as well to ensure effective moisture removal from compressed air. After six months of operation, have the compressor serviced by a qualified technician. These maintenance intervals keep your compressor operating efficiently and reliably.
What is the correct procedure to contact DTPPL technical support when the 3 Cavity Auto Blow Molding Machine needs help?
Contact DTPPL when the cause of a problem is unclear after checking this guide, feeder adjustments do not restore normal preform movement, a reed switch signal remains absent, a cylinder does not complete its movement cycle, or when compressor or dryer problems require qualified service. Provide details about the specific problem, the machine model, and your location. Prompt technical support prevents small issues from becoming major breakdowns that stop production.
Our associates











































Director – Global Marketing and Sales
Mr. Bhavesh from Dharmanandan Techno Projects Pvt. Ltd. has played a pivotal role in elevating the DTPPL brand to the global stage, leveraging his exceptional expertise in marketing and communications. He is committed to helping clients achieve significant growth while strengthening their own brands. Dharmanandan Techno Projects Pvt. Ltd. is a leading manufacturer and supplier of water purification systems and turnkey solutions for mineral water plants. With years of experience in designing and delivering high-quality water treatment solutions, the company provides end-to-end services, including system design, installation, maintenance, and ongoing support. Specializing in scalable and customizable water plants, DTPPL has successfully served industries worldwide, ensuring clean and safe drinking water across diverse applications.